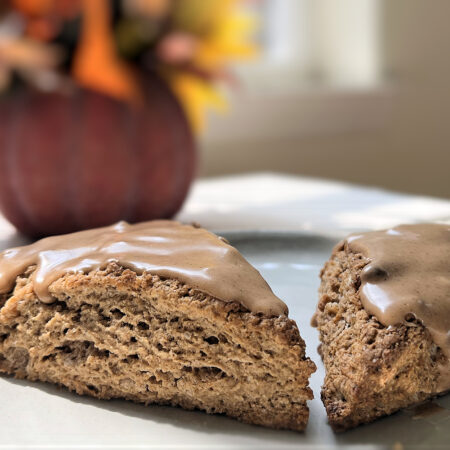
Pumpkin Spice Scones
Pumpkin Spice Scone, the close cousin of pumpkin pie and pumpkin muffins, is a fall favorite. These are some of the easiest scones to make and come out perfect every time. Spice of the glaze or icing for appetizing varietes sure to delight.
Print
Pin
Servings: 8 servings
Calories: 201kcal
Cost: $3.45 for 8
Equipment
Ingredients
Wet Ingredients
- ½ cup Whole milk*
- 1 Egg, large
Dry Ingredients
- 1 ½ cups All purpose flour
- ¼ cup Dark brown sugar**
- 2 ¾ tsps Baking powder
- ¼ tsp Baking soda
- ⅜ tsp fine sea salt 1/4 + 1/8 tsps
- 1 tbsp Pumpkin spice
- 4 tbsps butter***
Glaze Ingredients
- ½ cup Powdered sugar
- ½ tsp Pumpkin spice
- 1 tbsp Maple syrup or pancake syrup
- 1 tbsp Heavy Cream plus more to consistency.
Instructions
Wet Ingredients
- Combine the milk and egg.
- Blend the wet ingredients with a milk frother or blender.
- Transfer to a squeeze bottle and place in your refrigerator.
Dry Ingredients
- Mix the flour, dark brown sugar, baking powder, baking soda, salt, and pumpkin spice in a large mixing bowl.
- Slice the butter into chunks and mix with the dry ingredients.
- Cut the butter into the dry ingredients with a butter cutter until the butter is the size of peas.
- Put the bowl with the dry ingredients in your freezer for 15 minutes.
- Preheat your oven to 400°.
- Line your baking sheet with parchment paper.
Combine the Wet and Dry Ingredients
- Using the "tine method" (see video in step by step instructions above), combine the wet ingredients into the dry ingredients until the ingredients are wet but still pea sized.
Form the Scones
- Gently flip and press the ingredients in the bowl until they form one log.
- Fold the log in half and move it to a silicone mat.
- Using the guide of the measured circles on a silicone mat or a 7" ring, form the dough into a 7" circle by gently pressing from the center of the dough to the edges.
- If using a 7" ring, swirl the ring around the dough a few times to firm the edges. If forming by hand, press the edges of the dough lightly with the flat side of a long knife to firm the edges.
- Use a long serrated knife to make four equal cuts through the center of the dough to divide the dough into eight scones.
- Slide the flat edge of the long knife under each scone and move it to the parchment paper on the baking sheet, leaving about 1" between each scone.
Bake the Scones
- Place your baking sheet on a middle rack in your oven at 400° and bake for 8 minutes.
- After 8 minutes, turn the baking sheet around and bake for another 7 minutes.
- During the final bake, thoroughly mix the powdered sugar and pumpkin spice together in a medium bowl. Stir in the maple syrup and heavy until smooth but somewhat thick. It should slowly drip off a spoon. Adjust the amount of milk to your desired consistency.
- After 7 minutes make sure the centers of the scones feel firm, not liquidy. If not, bake for another 1 or 2 minutes.
- Remove the baking sheet from the oven and move the scones to a cooling rack with the flat edge of a long knife or a spatula.
Glaze the Scones
- Wait for the scones to cool before glazing. The glaze should be opaque.
- With a spoon (thicker glaze) or silicone brush (thinner glaze), spread or dab the glaze on the top of each scone.
- Optionally, you can use cream cheese, maple, pumpkin spice icing for a more luxurious topping, or a light vanilla or lemon glaze topped with a a dash of cinnamon powder on each scone.
Storage
- Cover any scones that will not be eaten right away. They will last about 5 days without refrigeration, about 10 days in your refrigerator, and about 3 months in your freezer.
- Let the scones cool completely before covering them with plastic wrap,
- To thaw frozen scones, let them come to room temperature (about 30 minutes) or microwave for 10 seconds.
Notes
*You can substitute 2%, Almond, Coconut, or Soy Milk for Whole Milk.
**You can substitute light brown sugar or granulated sugar. For a restricted sugar diet, you can put as little as 1 tbsp of sugar.
***You can use as much as 6 or as little as 2 Tbsps of butter .
Nutrition
Calories: 201kcal | Carbohydrates: 37g | Protein: 4g | Fat: 8g | Saturated Fat: 5g | Polyunsaturated Fat: 0.5g | Monounsaturated Fat: 2g | Trans Fat: 0.2g | Cholesterol: 39mg | Sodium: 351mg | Potassium: 74mg | Fiber: 1g | Sugar: 11g | Vitamin A: 257IU | Vitamin C: 0.01mg | Calcium: 118mg | Iron: 1mg