
Based on a November classic
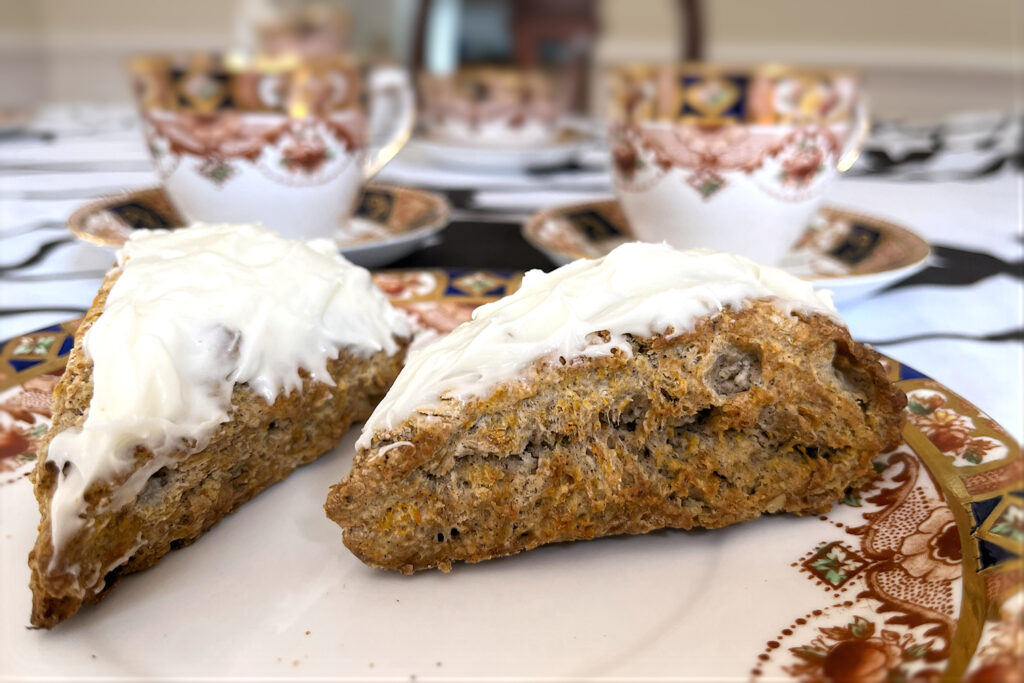
The classic Carrot Cake with the natural sweetness of fresh carrots and brown sugar topped with a vanilla cream cheese icing was the inspiration for these crispy November scones. The finely grated carrots add natural sweetness with less brown sugar.
Carrots, cinnamon, and ground gloves fill these scones with sweet, woody, citrus tones and a hint of heat. Chopped walnuts add a delightful crunch while the classic vanilla cream cheese icing balances the overall experience to a nostalgic treat as Thanksgiving approaches.
Step by step instructions
Blend the wet ingredients:
Blend the milk and egg together thoroughly using a milk frother or blender. Transfer the ingredients to a squeeze bottle and put it in your refrigerator to cool until you combine the wet and dry ingredients.
TIP: If you’re making a second batch to cook or freeze, blend the wet ingredients for both batches and place them in separate squeeze bottles.
Combine the dry ingredients:
Add the flour, brown sugar, baking powder, baking soda, salt, cinnamon, and ground cloves to a large mixing bowl and stir to combine.
Grate the carrots using a fine box grater. You should end up with about 1 cup of grated carrots. Add these to the other dry ingredients in small batches, using the tines of a large fork to thoroughly mix each batch before adding another. The carrots should be evenly distributed without any clumps.
Slice the butter into chunks:
Slice the butter into chunks by cutting the length of a stick of butter you’re using in half along its long side, flip it on its side, and slice it again in half. Then cut the long side in half and each half into quarters. Mix the butter chunks into the dry ingredients.

Cut the butter into the dry ingredients:
Use a butter cutter to cut the butter into the dry ingredients until they are about the size of peas.
TIP: Slightly larger chunks create a crunchier scone, leaving bigger gaps in the crumb when they melt.

Put the dry ingredients in your freezer for 15 minutes and preheat the oven to 400°. Line a baking sheet with parchment paper.
Combine the wet and dry ingredients:
After 15 minutes, remove the bowl with the dry ingredients from the freezer and place it on a sticky pad. A sticky pad makes this step go faster by keeping the bowl still while stirring in the wet ingredients. You may have to rub the bottom of the bowl to remove any ice before putting it on the sticky pad.
Remove the squeeze bottle with the wet ingredients from the refrigerator. Slowly combine the wet and dry ingredients by squirting a thin line with the squeeze bottle and rapidly stirring it in with the tines of a large (serving) fork. This MUST BE DONE BY HAND. You don’t want to create a mix or dough. You want to wet the dry ingredients to keep them in pea-sized clusters.

When the dry ingredients start to look wet, use the tines to pull the moist ingredients to one side. This will expose the drier ingredients below. Use smaller squirts from the squeeze bottle onto the dry ingredients and stir faster with the tines. When no dry ingredients are left, stop adding liquid.

Add in the chopped walnuts:
Sprinkle half of the chopped walnuts on top of the dough and mix thoroughly with the tines of the large fork. Sprinkle the remaining half of the chopped walnuts and again mix thoroughly with the tines of the large fork.
Form the dough:
Start to form the dough. Gently press it down and fold it a few times until it forms one log. Fold the log in half and move it to a silicone mat.

It’s easiest to form the dough using a 7” cake ring. Press the dough from the center outward until the dough fills the ring. Swirl the ring around the dough to give it a better edge. Then remove the ring.
If forming by hand, use the measured circles on your silicone mat to form the 7″ circle, then press the flat side of your long knife around the edges to firm them.

Cut the dough into eight scones:
Make four equal cuts with a long serrated knife to divide the dough into eight sections. Move the knife slightly back and forth on its flat side with each cut to make it easier to separate each scone.

Place the scones on your baking sheet:
Slide the flat side of the long knife under each scone and move it to the parchment paper on the baking sheet.
TIP: If you plan to store or serve the scones on a 10” cake round after they’re baked, make sure to place them on the parchment paper in the same order that you take them off of the dough circle. Otherwise, they will not form an even circle.

Bake:
Place your baking sheet on a middle rack in your preheated oven and bake for eight minutes at 400°.
When eight minutes is up, turn the pan around in the oven and bake for another seven to eight minutes. The center of the scones should feel solid, not liquidy. Remove the scones to a cooling rack.
TIP: If you plan to store or serve the scones on a 10” round after they’re baked, make sure to keep them in the same order that you took them off of the original dough circle. Otherwise, they will not form an even circle.
Ice the scones:
Leave the cream cheese out at room temperature while the scones are cooking. Wait until the cones have cooled before icing them.
Place the powdered sugar in the bowl of a stand mixer or a large bowl if using a hand mixer. Cut the cream cheese into cubes and mix it with the powdered sugar. Beat the powdered sugar/cream cheese with a flat blade on a low speed for about 2 minutes until they start to come together.
Add the vanilla extract, increase the speed of the mixer, and beat for 2 minutes until the ingredients are fully blended. Scrape down the sides and bottom of the bowl. Then put the mixer on its highest setting and beat for 3 minutes until it forms a velvety icing.
Use a spatula or frosting knife to spread a layer of icing on each scone.

Carrot Cake Scones
Equipment
Ingredients
Wet Ingredients
- ½ cup Whole milk*
- 1 Egg, large
Dry Ingredients
- 1 ½ cups All purpose flour
- 2 tbsp brown sugar**
- 2 ¾ tsp Baking powder
- ¼ tsp Baking soda
- ⅜ tsp Fine sea salt 1/4 + 1/8 tsps
- 2 medium Carrots Finely grated
- 5 tbsps Butter***
- ½ cup Chopped walnuts Added just before forming the scones
Icing Ingredients
- 1 ½ cup Powdered sugar
- 1 tsp Vanilla extract
- 4 oz Cream cheese
Instructions
Wet Ingredients
- Combine the milk and egg.
- Blend the wet ingredients with a milk frother or blender.
- Transfer to a squeeze bottle and place in your refrigerator.
Dry Ingredients
- Peel the carrots and remove the stems. Grate the carrots with a fine box grater. You should end up with about 1 cup.
- Mix the flour, brown sugar, baking powder, baking soda, and salt in a large mixing bowl.
- Slice the butter into chunks and mix with the dry ingredients.
- Cut the butter into the dry ingredients with a butter cutter until the butter is the size of peas.
- Add the grated carrots in small bunches, thoroughly mixing after each addition.
- Put the bowl with the dry ingredients in your freezer for 15 minutes.
- Preheat your oven to 400°.
- Line your baking sheet with parchment paper.
Combine the Wet and Dry Ingredients
- Using the "tine method" (see video in step by step instructions above), combine the wet ingredients into the dry ingredients until the ingredients are wet but still pea sized.
- After you have added the wet ingredients to the dry ingredient, add half of the chopped walnuts and thoroughly mx.
- Add the other half of the chopped walnuts and thoroughly mix.
Form the Scones
- Gently flip and press the ingredients in the bowl until they form one log.
- Fold the log in half and move it to a silicone mat.
- Using the guide of the measured circles on a silicone mat or a 7" ring, form the dough into a 7" circle by gently pressing from the center of the dough to the edges.
- If using a 7" ring, swirl the ring around the dough a few times to firm the edges. If forming by hand, press the edges of the dough lightly with the flat side of a long knife to firm the edges.
- Use a long serrated knife to make four equal cuts through the center of the dough to divide the dough into eight scones.
- Slide the flat edge of the long knife under each scone and move it to the parchment paper on the baking sheet, leaving about 1" between each scone.
Bake the Scones
- Place your baking sheet on a middle rack in your oven at 400° and bake for 8 minutes.
- After 8 minutes, turn the baking sheet around and bake for another 7 minutes.
- Take the cream cheese out of the refrigerator and leave it at room temperature.
- After 7 minutes make sure the centers of the scones feel firm, not liquidy. If not, bake for another 1 or 2 minutes.
- Remove the baking sheet from the oven and move the scones to a cooling rack with the flat edge of a long knife or a spatula.
Ice the Scones
- Wait until the scones have cooled before you top them with the vanilla cream cheese Icing.
- Put the powdered sugar in the bowl of a stand mixer, or a large bowl if using a hand mixer. Cut the cream cheese into cubes and mix is into the powdered sugar. Beat the sugar/cream cheese on low speed with a flat blade for 2 minutes until the it starts to come together.
- Add the vanilla extract and increase the speed of the mixer. Once it the ingredients are fully mixed, put the mixer on its highest setting and mix for 3 minutes. Scape down the sides and bottom of the bowl and mix again on high for 2 minutes. The icing will be velvety smooth at this point.
- Use a spatula or icing knife to put a layer of icing on each sonce.
Storage
- Cover any scones that will not be eaten right away. They will last about 2 days without refrigeration, about 7 days in your refrigerator, and about 3 months in your freezer.
- Let the scones cool completely before covering them with plastic wrap,
- To thaw frozen scones, let them come to room temperature (about 30 minutes) or microwave for 10 seconds.